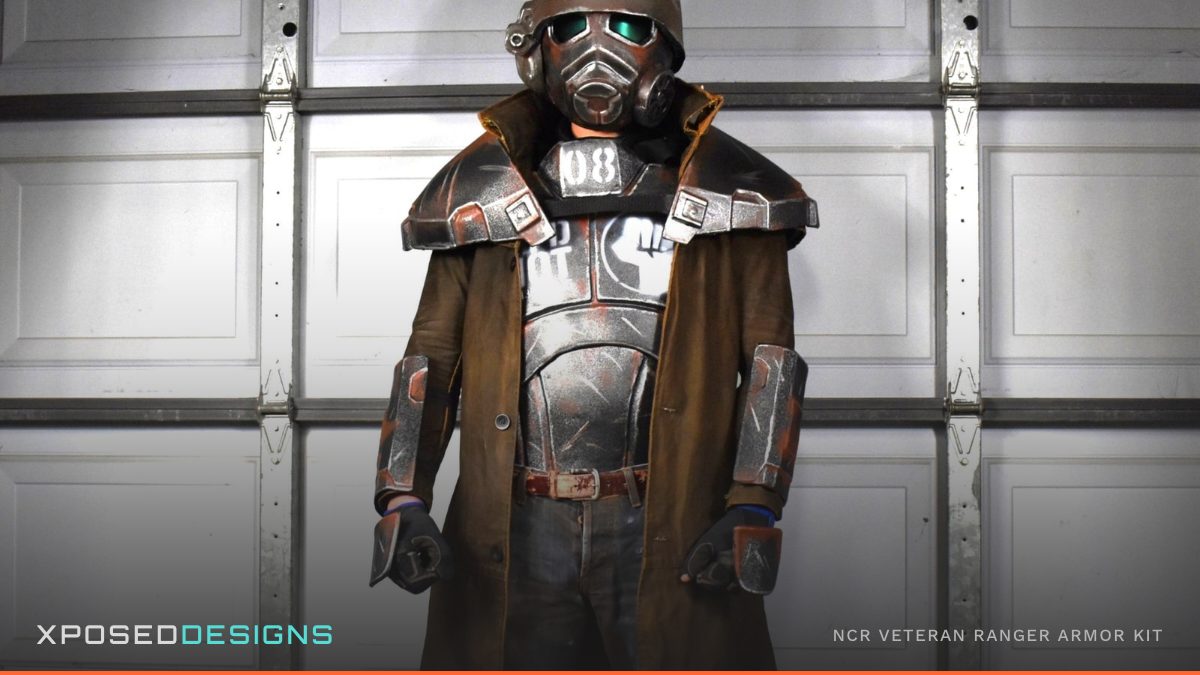
NCR Veteran Ranger Armor Kit: A Step-by-Step Build Guide
The NCR Veteran Ranger is consistently our most requested build, and for good reason. It's one of the most recognizable silhouettes in post-apocalyptic cosplay, and it's an achievable intermediate build once you understand the sequence: hard armor first, then costume integration around it. This guide walks through that sequence piece by piece.
If you haven't decided whether NCR Ranger is the right project for your skill level, our difficulty rankings guide rates it intermediate difficulty, with the challenge being cohesion across materials rather than any single piece being especially hard to build.
What Makes NCR Ranger a Different Kind of Build
Unlike a power armor suit, which is almost entirely hard plastic pieces, an NCR Ranger build combines hard armor (chest plate, forearm and hand pieces, helmet) with soft costume elements (duster coat, tactical gear, gas mask components). The hard armor pieces are where a kit removes the most difficulty; the fabrication work of forming accurate ranger armor plates from scratch is significant, and a thermoformed kit skips straight to assembly and finishing.
The soft goods side of the build (the duster, the layered tactical gear underneath) is a separate skill set from armor fabrication, closer to costuming than to plastic work. Plan for both halves of the build as distinct phases with different tools and techniques.
Step 1: Order and Inventory Your Kit
The NCR Veteran Ranger armor kit is available across DIY unassembled, assembled, and assembled-and-painted tiers, and individual pieces (chest plate, forearm and hand kit, helmet) are also available separately if you want to build the set incrementally or already own some pieces.
When your kit arrives, lay out every piece and check it against the listing before you start any work. Confirm you have all the shells you expect, check for any shipping damage, and get familiar with how the pieces are meant to fit together before committing adhesive to anything.
Step 2: Assemble the Hard Armor
Assembly happens before paint, always. This is the rule covered in detail in our ABS painting guide: the adhesives used to bond ABS pieces will peel cured paint off the surfaces they touch, so bonding a fully assembled, unpainted suit is the correct order of operations.
Chest plate: the centerpiece of the build and usually the first piece worth focusing on. If your chest plate ships in multiple panels, dry-fit them before applying adhesive to confirm alignment. Use epoxy for any rigid structural seams and contact cement for flexible attachment points like Velcro backing; our contact cement vs. epoxy guide covers when to use each.
Forearm and hand pieces: smaller and more manageable than the chest plate, but worth taking your time on since these pieces see a lot of movement and handling during wear. Confirm fit against your actual forearm before final bonding, not after.
Helmet: the gas mask-style helmet is one of the build's most recognizable elements. Drilling for straps or ventilation should happen at slow speed, per our attachment guide, to avoid heat-crazing the plastic around the hole.
Step 3: Paint the Assembled Armor
With the hard armor fully assembled, follow the full painting process from our ABS painting guide: clean with isopropyl alcohol, base coat, detail work, weathering, seal.
For NCR Ranger specifically, the classic scheme leans into worn, weathered tactical armor: a muted olive, tan, or khaki base with heavy dry-brush edge wear and a dark wash in the recessed panel lines. This is a build where weathering does real narrative work; a Ranger's armor should look like it's survived real use in the wasteland, not like it rolled off a shelf.
Krylon and Rust-Oleum work well as base coat brands, with Camo-brand spray paint for flat, no-shine sections where a matte apocalyptic finish is the goal.
Step 4: Plan the Costume Integration
This is the phase that separates a good NCR Ranger build from a great one, and it's the part most builders underestimate.
The duster coat is the single biggest visual element tying the look together. A weathered, distressed duster (whether purchased and aged or built from scratch) needs to visually match the wear level of your armor. If your armor is heavily weathered and your duster looks brand new, the two halves of the costume will fight each other visually.
Tactical gear (belts, pouches, webbing) fills the gap between the hard armor and the coat, and is what makes the silhouette read as "outfitted soldier" rather than "person wearing a chest plate." Military surplus and tactical gear suppliers are a good source for authentic-feeling components.
Layering order matters for both look and comfort. Base layer, then tactical gear, then hard armor pieces, then duster over the top (open or belted, depending on the specific look you're going for). Test the full layered outfit together before your event, not piece by piece, since bulk adds up across layers in ways that aren't obvious until everything is on at once.
Step 5: Strap and Fit-Test the Full Build
Once armor and costume elements are both ready, do a complete fit test wearing everything together. Walk, sit, raise your arms, and check that the chest plate and duster don't fight each other for space at the shoulders. Our attachment guide breaks down which strapping method fits which body zone; the chest plate typically pairs well with industrial Velcro backed by an internal harness for weight distribution, while the smaller forearm pieces do well with snaps or direct attachment.
Realistic Timeline
A full NCR Ranger build (hard armor plus soft goods) is a multi-week project for most builders, longer if you're sourcing or distressing the duster and tactical gear from scratch rather than buying pre-made pieces. Our 90-day build plan provides a phase-by-phase framework that applies well to this build specifically, since it already assumes separate phases for hard armor and costume integration.
If you're working toward a specific event and time is tight, the assembled or assembled-and-painted tier removes the hard-armor fabrication and finishing time entirely, letting you focus your remaining time on the soft goods and costume integration that make the biggest visual difference anyway.
Browse the full NCR Veteran Ranger armor kit and the rest of the lineup at xposeddesigns.com/collections/all. Questions about sequencing your specific build? Reach out, we're happy to help you plan it.
Building your own NCR Ranger? Drop your build questions in the comments. Follow @XposedDesignsLLC on Instagram for assembly and weathering walkthroughs.