Every Power Armor Variant Ranked by Cosplay Difficulty
Power armor is one of the most iconic looks in gaming cosplay. When you walk into a convention in a full suit, you own the room. But "power armor" isn't one thing. The post-apocalyptic genre has produced over a half-dozen distinct power armor variants across the games and TV adaptations, and they're not equally difficult to build. Some are genuinely beginner-friendly. Others will test seasoned builders. And a few are legitimately challenging projects that should probably wait until you've got a few successful builds under your belt.
This guide ranks every major power armor variant from easiest to hardest to cosplay, based on piece count, surface complexity, paint requirements, weight considerations, and the articulation challenges that come with a wearable suit. We've also factored in the availability of kits and templates, because the build path matters as much as the design itself.
Whether you're planning your first power armor build or deciding which variant to tackle next, this ranking will help you match the right project to your current skill level and timeline. We've built and troubleshot enough of these suits to know which decisions cost the most time. This guide reflects that experience.
Why Power Armor Difficulty Matters for Cosplayers
Picking the wrong power armor variant as your first build is one of the most common ways inexperienced armor cosplayers get derailed. It's not that any of them are impossible; dedicated builders finish all of these eventually. The problem is that mismatching your current skills to a highly complex variant means spending far more time troubleshooting than building, ending up with a result that doesn't match what you envisioned, or simply burning out before the project is done.
The right variant for your skill level isn't a compromise; it's a strategy. The T-45 and T-51B both read as unmistakably iconic post-war power armor in photos and at conventions. Choosing one over the other isn't about settling; it's about setting yourself up to finish what you start, wear it with confidence, and be ready for a more ambitious build next time.
There's also a cost dimension. More complex variants require more materials, more finishing work, and potentially more specialized techniques. For a detailed look at how build complexity affects total cost, see our cosplay armor cost breakdown for 2026.
How We Ranked These (Criteria)
Every variant in this list was evaluated against the same five factors:
Piece Count: How many individual armor pieces does a full suit require? More pieces means more build time, more attachment points to engineer, and more opportunities for fit issues.
Surface Complexity: Does the armor have relatively flat, geometric panels, or does it feature complex curves, recesses, and compound angles that are hard to form or replicate accurately?
Paint Difficulty: Is the canonical paint job achievable with basic spray cans and brush work, or does it require advanced masking, multi-layer effects, oxidizing or self-rusting patina paints, or specialized techniques like NMM (non-metallic metal) or OSL?
Weight and Wearability: How much does a full suit weigh, and how demanding is it to wear for a full convention day? Related: does the suit require internal structural support or a harness system to stay stable? Material choice affects this beyond raw weight: EVA foam insulates heavily and causes wearers to heat up quickly during wear, and foam can tear under the sustained stress of a full convention day. Thermoformed ABS handles convention wear significantly more durably.
Articulation Challenges: Power armor is designed to look rigid, but convention wear requires you to walk, sit, turn, and navigate doorways. Variants with complex overlapping plates or tight joint geometry create harder articulation problems.
The Rankings (Easiest to Hardest)
#1 Easiest: T-45 Power Armor
The T-45 is the original: the power armor design introduced in the first installment and carried forward through the franchise, and the suit featured prominently in the early episodes of the recent TV adaptation. It's also the most forgiving power armor design to build.
What makes the T-45 beginner-friendly is its geometry. Compared to later designs, the T-45 features relatively boxy, geometric armor panels with less aggressive compound curvature. The chest is broad and flat, the limb armor uses simple shapes, and the helmet, while distinctive, has manageable surface complexity. Paint-wise, the classic olive drab or weathered metal scheme is achievable with spray cans and basic weathering technique, and you don't need an airbrush to get a convincing result.
The T-45 also has strong visual impact per piece. Even a partial build (chest, shoulders, and helmet) reads clearly as T-45 to any wasteland fan, which means there's a viable path to a convention-ready partial suit before you've committed to building every piece.
Recommended build method: T-45d Power Armor Full Cosplay Kit in thermoformed ABS (fastest path) or EVA foam for budget builds. Estimated build time: Beginner ~50+ hours, intermediate 16–24 hours, expert ~8 hours. Skill level: Beginner–Intermediate
#2: Raider Power Armor
Raider Power Armor is one of the more approachable power armor builds once you understand what makes it tick. Unlike the standardized military variants, Raider armor is meant to look scavenged, asymmetrical, and improvised. That aesthetic gives builders enormous creative latitude. You can build onto whatever frame you like (foam, ABS, repurposed plastic), and as long as the result reads as "wasteland", damaged, rusted, bulky and jury-rigged, it works.
The construction itself is less technically demanding than the T-51B or T-60. You're stacking and bonding EVA foam panels together (contact cement is your friend here), building up a deliberately bulky silhouette, and adding salvage details like fake rebar, prop bones, plastic barbed wire, fake sheet metal made from EVA foam, and any other "found" elements that suit the character. There's no rhyme or reason, and that's the point.
We completed the Overboss armor from the Nuka-World expansion using exactly this method. It's a relatively simple build of stacking EVA foam and cementing pieces together until you have a suit. The challenge isn't the assembly. It's the paint job.
The paint is where Raider builds live or die. Standard spray paints will work for base coats, but the realism that makes a Raider suit look authentic comes from oxidizing paints and self-rusting patina paints designed to develop real-looking corrosion over time. These products go miles further than flat color in selling the "rust devil" or "post-apocalyptic salvage" look. Plan for layered weathering (rust streaks pooling in low spots, edge wear on raised surfaces, blackened "burn" marks at fabricated weld points).
Recommended build method: EVA foam stacked and contact-cemented, with mixed salvage materials for surface detail. Optional ABS panels for structural elements. Estimated build time: ~40–80 hours depending on size and detail level (in our experience a strong build comes together faster than the standardized military variants). Skill level: Beginner–Intermediate (with strong aesthetic judgment)
#3: T-51B Power Armor
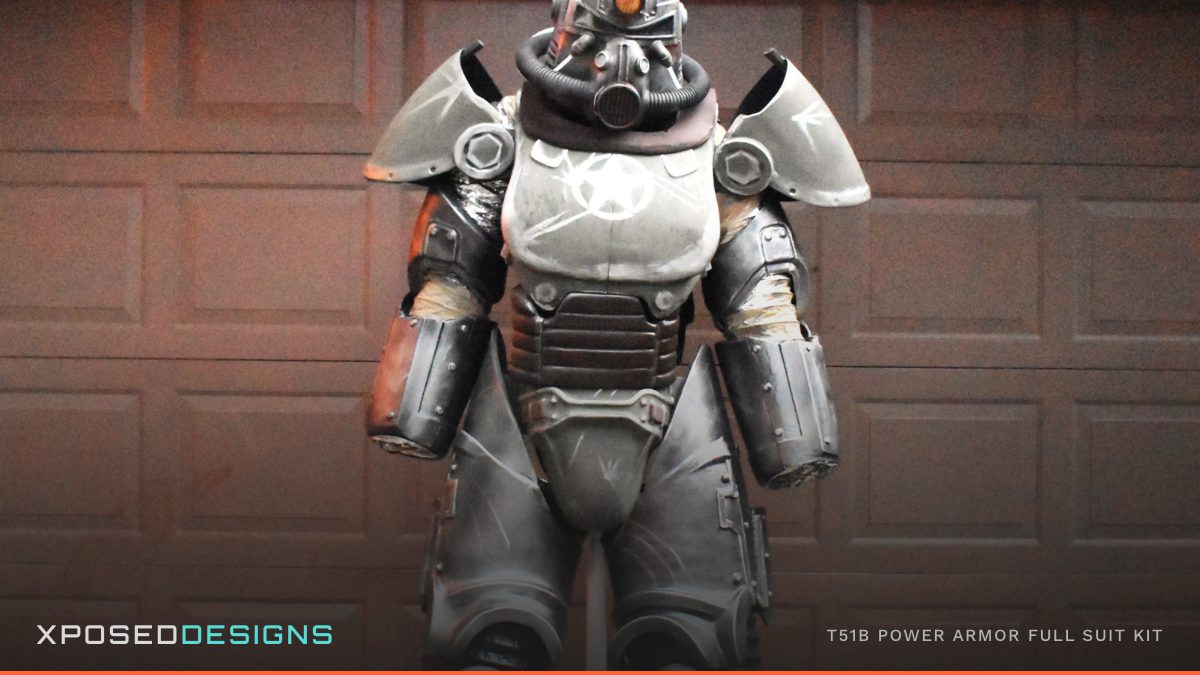
The T-51B is the design most people picture when they hear "post-war power armor": the sleek, rounded suit from the retro-futurist era of the franchise, with its distinctive ribbed chest plate and art deco lines. It's a step up in complexity from the T-45 and Raider, but it remains one of the most achievable full power armor builds for an intermediate cosplayer.
The T-51B's surfaces are more curved than the T-45, particularly on the chest and helmet. The curved helmet brow and rounded shoulder pauldrons require either thermoformed pieces (the ABS kit advantage) or careful heat-forming work in foam. Getting those curves right from raw materials requires skill and patience.
That said, the T-51B's paint scheme is relatively accessible. The iconic teal-and-chrome or military green colorways work well with spray paint, and the surface isn't loaded with fine recessed detail that demands precise masking. It's also one of the best-documented power armor builds in the cosplay community, which means there's a wealth of reference photos and build documentation to work from.
We make the T-51B Power Armor Full Suit Kit in thermoformed ABS specifically because the curved chest and helmet geometry is where scratch-foam builders most often lose weeks of time. The thermoformed pieces handle that challenge for you, so your effort goes into finishing and painting rather than fighting with heat guns.
Recommended build method: ABS thermoformed kit or EVA foam with a strong reference build. Estimated build time: ABS kit path roughly cuts the scratch-foam build time in half thanks to pre-formed curves. Skill level: Intermediate
#4: T-60 Power Armor
The T-60 is the workhorse Brotherhood-style armor, and it's a meaningful step up in visual complexity from the T-45 and T-51B. Where the earlier suits have mostly clean surfaces, the T-60 features more aggressive surface geometry: deeper panel lines, more articulated limb armor, and a helmet design with additional asymmetrical elements.
The paint situation is also more demanding. Brotherhood-style T-60 builds typically feature a dark metallic base with unit insignia, weathering, and often some worn edge work. Getting heraldry painted cleanly requires masking skill or decals. The weathering needs to look intentional rather than sloppy, which is achievable, but requires more patience than the simpler T-45 schemes.
Structurally, the T-60's more articulated limb design creates some interesting wearability challenges. The overlapping knee and elbow joints on an accurate T-60 build need to be engineered carefully to allow natural movement without the armor catching or restricting. Builders who skip this engineering phase end up with a suit that looks great standing still but is miserable to wear.
We do not currently offer a full T-60 suit kit. We do offer a T-60 Power Armor Helmet DIY kit for builders who want that distinctive helmet in thermoformed ABS while taking the EVA foam route (or commissioning complex pieces) for the rest of the suit. Build times reflect this. A beginner working from foam patterns will easily put in 100+ hours. An intermediate builder with a solid grasp of ABS-to-EVA-foam connections (using contact cement to bond mixed materials cleanly) can finish in approximately 60 hours.
Recommended build method: EVA foam for the body (best surface manipulation flexibility), plus the T-60 helmet kit for the headpiece, or commissioned ABS for other complex pieces. Estimated build time: Beginner 100+ hours; intermediate ~60 hours. Skill level: Intermediate–Advanced
#5: X-01 Advanced Power Armor
The X-01 is the prestige suit: the endgame power armor with a sleek, angular silhouette that reads as simultaneously more advanced and more alien than the earlier designs. It's a beautiful build target, and it's also substantially more demanding than anything ranked above it.
The X-01's challenge is compound surface complexity combined with demanding articulation requirements. The suit features complex multi-plane surfaces that change angle frequently, sharp geometric transitions, and a body shape that requires precise scaling to look right on a human form. Builders who approach this one with basic foam skills and no experience scaling patterns to their body typically produce results that look undersized or disproportionate.
Paint complexity is also high. The canonical X-01 paint jobs (whether the iconic olive/silver scheme or faction repaints like the Enclave version) involve clean color blocking across complex surfaces and often feature subtle material differentiation between metallic and matte sections.
This is a build that should be pursued after you have some practice building one or two power armors. Estimated build time is 100+ hours for both beginners and intermediates, especially when it comes to scaling to in-game proportions on a real human body. Don't underestimate the scaling challenge.
Recommended build method: EVA foam with heat-forming experience, or high-end 3D printing with extensive post-processing. If going the 3D print route, filament choice matters (PLA, PETG, ABS, and ASA all behave differently for large structural pieces). Budget for failed prints: layer shifts, bed adhesion failures, and layer separation can ruin a 50+ hour print at any stage. Large 3D-printed full suits are also blocky, cumbersome, and can be uncomfortable to wear; factor in wearability alongside build difficulty. Estimated build time: 100+ hours for both beginners and intermediates. Skill level: Advanced (recommended only after one or two prior power armor builds)
#6 Hardest: Tesla / Edison Power Armor
The Tesla / Edison-style power armor (sometimes called Strangler Heart in its high-end variants) is the genuinely hardest power armor variant to cosplay accurately. It's not the bulkiest. It's not the heaviest. What makes it the hardest is a category of challenge no other suit on this list demands at scale: integrated theatrical lighting.
A convincing Tesla build requires multiple working light elements (electrified coils, glowing nodes, animated arc effects on the back-mounted Tesla rig) that have to actually work, in costume, for a full convention day. That means:
- Wiring runs hidden inside the armor without compromising structural integrity
- A power source (battery pack) that lasts long enough for a full day and is comfortable to wear
- LEDs or EL wire chosen and positioned so the light effects read correctly in both convention lighting and outdoor photography
- Switches accessible to the wearer without breaking the silhouette
- Heat management for any lights that run warm
The lighting work alone elevates this build to "expert" territory before you've cut a single piece of armor. Layered on top of that, the sculptural elements (the Tesla coils, the spike fins, the deep recessed channels typical of these designs) require either exceptional foam sculpting, high-quality 3D printing, or thermoformed plastic to hold their shape. The paint job adds another layer of difficulty: the canonical dark metallic with heat-discoloration, electrical-burn, and ozone-pitting effects requires layered techniques to look accurate rather than painted-on.
Weight management is also significant. The fin structures, light elements, battery pack, and additional surface detail add substantial material. Distributing that weight into a wearable harness system that doesn't pull on the bodysuit or strain the wearer over a long day is a non-trivial engineering problem in its own right.
Recommended build method: Hybrid build. 3D printing with resin coating for structural fin and coil elements, foam or ABS for the main body panels, and a separate electronics integration phase for the lighting work. Plan the wiring before you finish the panels; retrofitting wire runs into a sealed armor piece is a nightmare. Print structural elements at high infill, otherwise pieces can be brittle and break if dropped. Budget for significant print failures: layer shifts, bed adhesion issues, and layer separation can destroy a long print at any point. Estimated build time: 150+ hours, including a dedicated electronics integration phase. Skill level: Expert (don't attempt without two or more prior full-suit power armor builds and electronics experience).
Honorable Mention: Hellfire Power Armor
The Hellfire is a difficult build, but not the hardest. Its defining features (the angular spike fins along the spine and limbs, the deeply recessed surface channels, and the overall profile that's simultaneously more aggressive and more organic than other suits) all present real engineering challenges. The fin structures in particular require rigid internal framing to hold their shape without drooping or warping after hours of wear. Building fins that look right in photos is one skill; building fins that survive a full convention day is another.
What makes the Hellfire genuinely difficult is bulkiness and size more than complexity. The surface complexity is real, but the construction methods are well-understood and don't require the lighting work that makes a Tesla build expert-tier.
If you're drawn to the Hellfire silhouette, treat it as a stretch project for an experienced intermediate builder rather than the hardest mountain to climb. It's somewhere between the X-01 and the Tesla in actual difficulty.
Recommended build method: 3D printing with resin coating for structural fin elements, combined with foam or ABS for the main body panels. Estimated build time: 80–120 hours. Skill level: Advanced
What About Non-Power-Armor Cosplays?
Power armor gets most of the attention, but some of the most striking wasteland cosplays aren't power armor at all. Two standouts:
NCR Veteran Ranger
The NCR Veteran Ranger is arguably the most aesthetically compelling non-power-armor wasteland build. The combination of the iconic gas mask helmet, duster coat, tactical gear, and combat armor pieces creates a silhouette that's immediately recognizable, and increasingly recognized by the broader audience as the recent TV adaptation has introduced more people to the faction.
Build difficulty: Intermediate. The armor pieces themselves are simpler than power armor: smaller, more geometric, and fewer of them. The challenge is in achieving the right cohesive look across materials: the duster coat is fabric or leather work, while the chest and arm plates are hard armor. Getting those two material worlds to look unified requires planning. The gas mask or patrol helmet needs careful work to get accurate.
We make the NCR Veteran Ranger Armor Kit in thermoformed ABS because the chest plate and forearm pieces are where scratch builders tend to lose the most frustrating time. Once the hard armor is handled, your focus goes to the costume integration: the duster, the gas mask, the tactical gear that ties it all together.
Combat Armor
Combat Armor is the wasteland's "grunt" armor: the practical, worn, utilitarian look that shows up across multiple games. It's a great cosplay choice precisely because of its simplicity and wearability. Fewer pieces, simpler geometry, and a paint scheme (worn military olive or khaki with realistic weathering) that beginners can execute convincingly.
Build difficulty: Beginner–Intermediate. The combat armor silhouette doesn't demand the scale and structural engineering of a full power armor suit, which makes it a great first armor project. It's also lighter and more comfortable to wear for full convention days than power armor.
We make a full Combat Armor set in thermoformed ABS. It's one of the most accessible builds we offer, and consistently one of the strongest performers at conventions for first-time armor cosplayers who want a recognizable wasteland build without the full power armor commitment.
Choosing Your First Power Armor Build
Here's a simple decision framework based on the three variables that actually matter: budget, skill level, and available time before your target convention.
If you have limited budget: Start with the NCR Veteran Ranger or Combat Armor. Both are available as ABS thermoformed kits at the most affordable price points, both deliver strong visual impact, and neither requires the extensive material investment of a full power armor suit.
If you have a modest budget and are a first-time builder: The T-51B power armor cosplay DIY kit is the sweet spot. It's iconic, it has strong convention presence, the kit removes the hardest geometry challenge, and the paint requirements are manageable for a first-time builder. See the 90-day cosplay build plan for a realistic timeline from kit order to convention day.
If you want creative latitude and a wasteland aesthetic: Raider Power Armor is genuinely approachable for a builder who's comfortable with EVA foam and confident in their paint work. The "stack and improvise" build method rewards craft judgment over precise pattern-following. Plan for an oxidizing or self-rusting patina paint to sell the rust-devil look.
If you're an experienced builder looking for a challenge: T-60 or X-01 will test your skills meaningfully. Approach both with strong reference materials and a plan for the articulation engineering, not just the surface aesthetics.
If you're going for the ultimate convention build: Tesla / Edison armor, including the Strangler Heart variant, is the pinnacle. Don't attempt without prior power armor experience and electronics integration skills, but if you pull it off, it photographs like nothing else on the floor.
For a deeper look at building any of these suits, the post-apocalyptic cosplay guide covers each variant from a different angle, focusing on which builds are peaking in cultural relevance right now and why starting your build soon positions you best for the summer convention season.
Ready to start your wasteland armor build? XposedDesigns makes thermoformed ABS armor kits inspired by the T-51B power armor, NCR Veteran Ranger, and Combat Armor, available in DIY unassembled, assembled, and fully painted tiers. Browse the full lineup at xposeddesigns.com.
Follow @XposedDesignsLLC on Instagram for build photos of the T-51B, T-45d, Raider Overboss, APA Tesla Armor, and Strangler Heart cosplays referenced throughout this article.